How to set up meeting templates
How does this functionality work?
The Meeting Templates tool in DecisionVault allows you to build up an additional section of the questionnaire which can only be used by firm staff. You can create up to 10 different meeting templates per questionnaire.
You can use this to build up meeting templates to run your client meeting and capture what needs to happen next with the client's case / how documents should get drafted:
- Choose which questions (& their answers) from the client questionnaire to include, and in which order
- Add questions to capture drafting choices
- Use some question types that are not available on the regular client questionnaire - such as a question to appoint contacts into a specific role
- List meeting topics you want to make sure you discuss with the client

Video Demo
Having the meeting (digital version)
Once you have this section setup you can open it up from the matter detail screen to answer the questions digitally.

You can use the "quick jump" links on the right hand side to quickly scroll to a particular part of the section.

Having the meeting (paper version)
If you prefer to take notes on paper (or iPad/tablet) you can also export an empty fill-in document version for a given matter.

This document will contain all the questions you put onto your meeting template - including (for questions embedded from the questionnaire) the answers provided by the client on the questionnaire.


How to set this up?
You can find the setup under Settings > Customization > Open a questionnaire. Then open the Meeting Templates tab.

Creating a New Meeting Template
To add meeting templates click New Meeting Template.

You will be prompted to enter:
- Name -The internal name of the template (example: Married Couples Design Meeting).
- Description (optional) -A short description explaining when the template should be used.
After entering the details click Create Meeting Template. The new template will now appear in the template list.
You can now start by structuring the outline of the talking/decision points you normally go over during a meeting with clients. Click on Add and select the "Header Text & Divider" display element.

When adding the headers, remember to leave some space between each. This will allow you to easily add more elements and questions to those sections later on.

Then add in the Specific Components to the sections. These components will display your client's data wherever you need to reference it in your meeting template.


There is also an "Embed Question (& Answer) from Questionnaire" Specific Component that enables you to incorporate any question/answer from the questionnaire into your meeting template.

This will show up on the "screen" version of the meeting template for a given matter with a blue bar in front to show it's an embedded question:

To capture additional notes along the way you can insert additional "long text" fields.

Common Patterns
Setup of roles
First add a "Role Picker for Specific Role" Specific Component in your section.

Then embed the "group of people" question from the client questionnaire below it.

Note: To choose the options for both the Client and Spouse using the Role Picker, you must make sure the role is marked as "Split" from the Roles tab in the Customization screen of the questionnaire.
Template Text Component
You can further customize your meeting template by adding a Template Text Component. This new component will come in handy when adding repeating sets of questions, like gifts in the example below.

The following video provides a quick overview on how and when to use this component:
Contacts (Read-Only) Component
You can now add a Contacts (read-only) component directly to a meeting template.
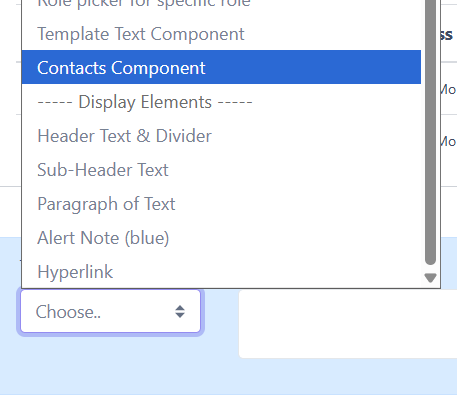
This component displays key contact information pulled from the matter, including:
- Name
- Relationship
- Address
- Phone
- Date of birth
The Contacts component is view-only and is intended for reference during meetings. It will also be included when the meeting template is exported, making it useful for preparation, review, and documentation.
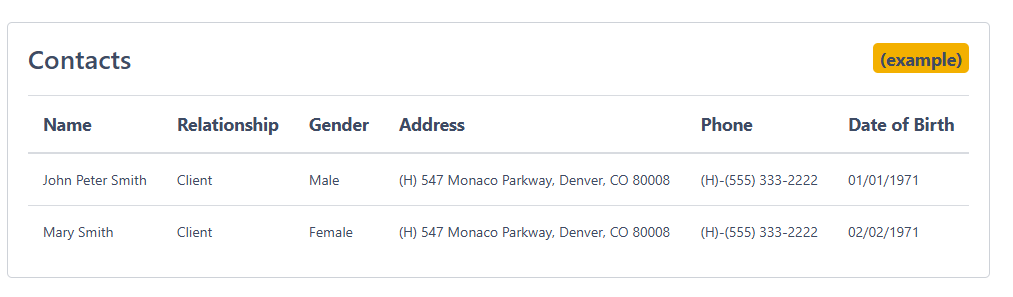
Use the Contacts component when you want:
- A clear, structured overview of all relevant people on the matter
- Easy access to relationship context during a client meeting
- Contact details visible without editing risk
Because this component is read-only, all updates to contact information should continue to be made within the questionnaire itself from the Contact Details section, not on the meeting template.
Importing and Exporting Meeting Templates (JSON)
DecisionVault also allows firms to export and import meeting templates using JSON files. This makes it easier to reuse templates across different questionnaires or environments.
How to export a Meeting Template:
- Open the Meeting Templates section.
- Select the template you want to export.
-
Click Export questions (JSON).
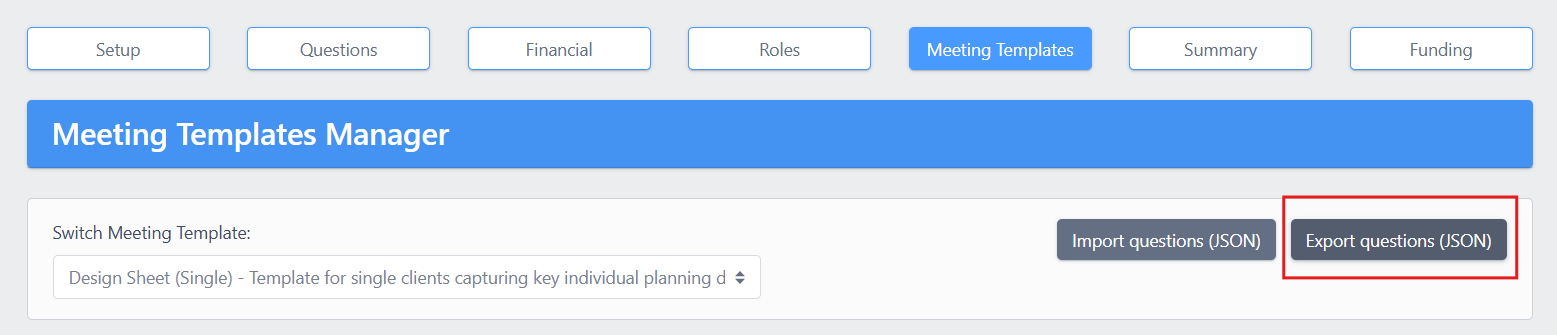

A JSON file will be downloaded containing the full structure of the template.
How to import a Meeting Template:
- Open the Meeting Templates section.
- Select the meeting template where the new questions should be added, or add a new meeting template.
- Click Import questions (JSON).
- Upload the selected JSON file.

This will now add the sections and questions from the JSON file into your existing (or new) meeting template.